WARNING: THIS POST CONTAINS PHRASES SUCH AS ‘INSERT THE
STICKY END OF YOUR STICK INTO THE BALLS’
There is no way to dance around every ball-innuendo, so I’m just going to say what I mean, and we can all have a little giggle at the end.
There is no way to dance around every ball-innuendo, so I’m just going to say what I mean, and we can all have a little giggle at the end.
Cake Pops are storming the internet like a
manic-sugar-filled craze by bloggers and Youtubers alike all hopped up on Candy
Melts. So of course, I’ve commissioned the help of a friend with
Kitchen-know-how, because I need all the help I can get in the kitchen
department. This is why I’m with a Chef.
I know what I’m doing; I knew I needed to hitch my wagon to someone who
knew they had to feed me.
Cake
Pops look so kitsch and cute but we have all seen the horrific fails on
Pinterest. In fact, I might paste in some fail pictures so ours don’t look so
bad at the end.


On the other hand, how awesome are these? Cake Pops with awesome
things on! And just so we know, the
doctor ones remind me of Grey’s Anatomy; I don’t just enjoy hospitals.


So, let’s get on with the story.
I arrived at Cassi’s
at 4pm; “plenty of time” we said. A quick pop to both Sainsburies and Tescos –
we gathered our ingredients. Deciding to
make a slightly classier cake pop, we went with Sicilian Lemon flavouring for
the cakey-middles and a dark chocolate to coat them. Fuelling our love for
sprinkles and glitter, we chose Lemon Meringue Sprinkles to go on top as well
as some Banofee ones. Admittedly, the banoffee flavours maybe wouldn’t marry so
nicely with the lemon/dark chocolate theme but what the hell.
Following a measurements guide that I borrowed from a Zoella video on Youtube, we measured out our ingredients and realised we didn’t have a
cake recipe. Trusty BBC Food online quickly provided us with a Fairy Cake
Recipe and we were on our way! I’d also seen a Niomi Smart video on Youtube,
which made them look so easy and simple – with Cassi on my side, I couldn’t see
us meeting any big problems. Which is interesting seeing as the evening started
like this;
Me: I’m going to need a whisk.
Cassi: I have an electric whisk?
Me: Nah, I can use a hand whisk.
(Five minutes, pratting around with a hand whisk.)
Me: Yes, I’m going to need your electric whisk.
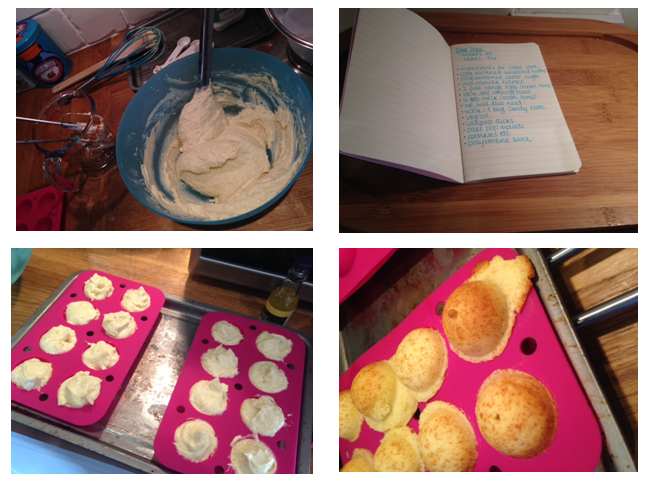
From the pictures above, so far, we look like we’re being
fairly neat. This is not true, as you can see by the ‘after’ baking picture in
the bottom-right hand corner.
We baked our cake mixture for around fifteen minutes and
checked if they were done with one of our cake pop sticks. It came out clean,
so they were done and this is where we fell as the first hurdle. I feel like our thought process literally went
‘Yay, they’re done! – Let’s decorate them!’
THIS IS NOT THE MIND FRAME YOU WANT TO BE IN.
Having learned the hard way, we jumped straight into
decorating and attempting getting our cake-balls to sit on the sticks. Looking back
in hindsight, I probably should have done more research on this stage of the
game. Our cake balls were either too warm in the middle still or the chocolate
on the end of the sticks wasn’t solid enough yet. I will put a full ingredients list and recipe
a little further down, so you can follow it if you want, but for the moment
this is just a commentary of do’s and don't's.
After a little Googling and many cake-themed message boards
we learned that we should have let the cake-balls in the freezer, before
putting the pop-sticks in. So instead, what we did was put the sticks in and
then freeze them. Only for ten minutes or so, but this became the answer to our
problems; the chocolate on the end of the sticks (to secure the balls on the
sticks) solidified wonderfully and we were, at last, finally good to go on the
decorating front.
It was, unfortunately, at this point that we realised we had
no idea how to store the cake-ops upright. Balls up, if you will. This is where
a lot of ‘pinterest fails’ appear. I would say your best bet is to cover some
Oasis Floristry Foam in delightful wrapping paper and storing them in that,
post-decoration. Y’know, if you want to be super fancy.

As you can see, our cake-balls overflowed a little but we
simply trimmed them down until they looked like teeny tiny planets. This is
where the idea of a full series of planets came to me – it made me want to
create a whole solar system of cake pops. I digress.

So, the Pops in the egg box were our first
attempt and the Pops in the duck-egg blue cup were dubbed ‘the good ones’. We
decorated the Pops and then put them back in the freezer for a further ten
minutes or so.
In the meantime we used up left over cake mix to create the Lemon Loaf (top right hand corner, the one that doesn’t look like a cake pop).
In the meantime we used up left over cake mix to create the Lemon Loaf (top right hand corner, the one that doesn’t look like a cake pop).

Why did it take six hours to collect ingredients and make Cake Pops? I don’t
know.
Were they worth it? Probably; the laughs at least definitely were.
Were they worth it? Probably; the laughs at least definitely were.
Ingredients:
Makes 20.
Takes 1 hr. (Apparently.)
Makes 20.
Takes 1 hr. (Apparently.)
120g Softened Unsalted Butter.
150g Unrefined Caster Sugar.
1tsp Whatever Extract You’re Using.
2 Free Range Eggs.
180g Self Raising Flour.
4 tbsp Milk (Room Temp, apparently.)
2 Bars of Cooking Chocolate (Dark/White/Whatever...)
Vegetable Oil
Cake-Pop Moulds/Sticks
Sprinkles etc.
Cups/Egg Box/ Oasis Floristry Foam/ Polystyrene.
150g Unrefined Caster Sugar.
1tsp Whatever Extract You’re Using.
2 Free Range Eggs.
180g Self Raising Flour.
4 tbsp Milk (Room Temp, apparently.)
2 Bars of Cooking Chocolate (Dark/White/Whatever...)
Vegetable Oil
Cake-Pop Moulds/Sticks
Sprinkles etc.
Cups/Egg Box/ Oasis Floristry Foam/ Polystyrene.
Recipe:
Could take you all day, just saying.
Could take you all day, just saying.
1. Make your
cake mix. You can use the fairy cake recipe from BBC Food Online for that. I’ll
link it here.
2. Use two
teaspoons to shimmy some of the mix into the silicone Cake-Pop moulds. I would
say somewhere between heaped and level.
3. Wait
somewhere between 15 and 22 minutes depending on the trust you have in your
oven. Ours came out in 15 minutes, but I’ve seen people online take 22 minutes.
4. As soon as
your cake-balls are done (stick a cake-pop stick into one, and if it comes out
clean they’re done) take the mould lids off, and put them in the freezer. This
chills the balls (haha) and will make the next steps easier.
5. Melt your
chocolate in a glass bowl over some boiling water in a sauce pan. Do not put
your chocolate in a microwave, as we learned, this is not a good way to go.
6. Once your chocolate
is melted, remove balls from freezer, squeeze them gently out of the moulds. It
doesn’t really matter if they’re not perfectly spherical – the decorations
later will hide any mishaps. Dip your cake pop sticks into the melted chocolate,
just the tip, and then push them gently into your cake balls; from experience, I’d say about
halfway into your balls. If you can, store them upside down (in an egg box,
possibly) and put them back into the freezer for a further five minutes or so
to solidify the ‘sticking’ chocolate.
7. When the ‘sticking’
chocolate is officially hardened enough to your satisfaction, remove them from
the freezer and the decorative process can start. Yay!
8. Slowly dip
and roll them in your melted chocolate, hand them to your handy co-worker and
let them sprinkle to their hearts content. Repeat until all balls are chocolate
covered and decorated.
9. Store them
again in the freezer until shells are hardened.
10. Cake Pops
will only last three days or so, so if serving at a party or giving as a gift,
I suggest making them the day before and storing them in the fridge for no
longer than fifteen minutes.
11. Hurrah
Cake-Pops.
Have you guys made Cake Pops? How did they go? Any tips and tricks for next time? Let me know in the comment section below. :)
No comments:
Post a Comment